Beta Features#
Upon request, ArchMap users are able to upload their own atlases. Additionally, a benchmarking pipeline can and should be run post-upload to compare the integration of the uploaded atlases with other integration methods. Once successful benchmarking has taken place, the user can download their benchmarking results and send it to the ArchMap team via the contact form on the website to complete the revision stage. Once the atlas revision stage is completed, the atlas builder has the option to make their atlas public for other users to map to (by default, the atlas can only be accessed by the uploader). These steps are outlined in more detail below.
For Atlas Uploaders#
Steps to upload atlases to ArchMap:
Before uploading your atlas, we ask that you please run this script to prepare your atlas for upload.
Go to https://archmap.bio
Sign up for an account by clicking on “Sign Up.”

Click on the option: “Request for Beta Feature”

Once clicked, please wait while we review your request. Once your request is approved, you will be able to access the tab labeled “Upload Atlas.” Now log in by going to https://archmap.bio and clicking on the “Log In” button in the top right corner.
Click on the option “Upload Atlas” on the sidebar. Note that you will only see this option if we have accepted your request for this beta feature. You can see all the atlases you have uploaded here. If you have not uploaded any atlases, you will see “No atlases uploaded.”

To upload an atlas, click on the “Upload Atlas” button. You will get a form where you will need to fill in the details of the atlas. Please make sure the h5ad file you are uploading has the count data stored in the .X attribute. This is important for benchmarking during the revision stage.

For uploading the atlas, you can either upload the atlas by clicking on the “Upload” button or you can provide the link to the atlas in the “Link” field. Please make sure that you are uploading an .h5ad file with count data (i.e. a non-minified version), as the count data is necessary for the benchmarking pipeline to validate atlas integration quality.

9. To add the compatible model associated with it, you can select the compatible model and then upload it by clicking on the “Upload” button. To upload an scPoli model to ArchMap, please follow the tutorial provided here. As the scPoli output after integration generates three separate files, it is necessary to combine these files to upload to ArchMap. The necessary steps are outlined in the linked tutorial.

Note that along with the atlas and model files, the following information is required:
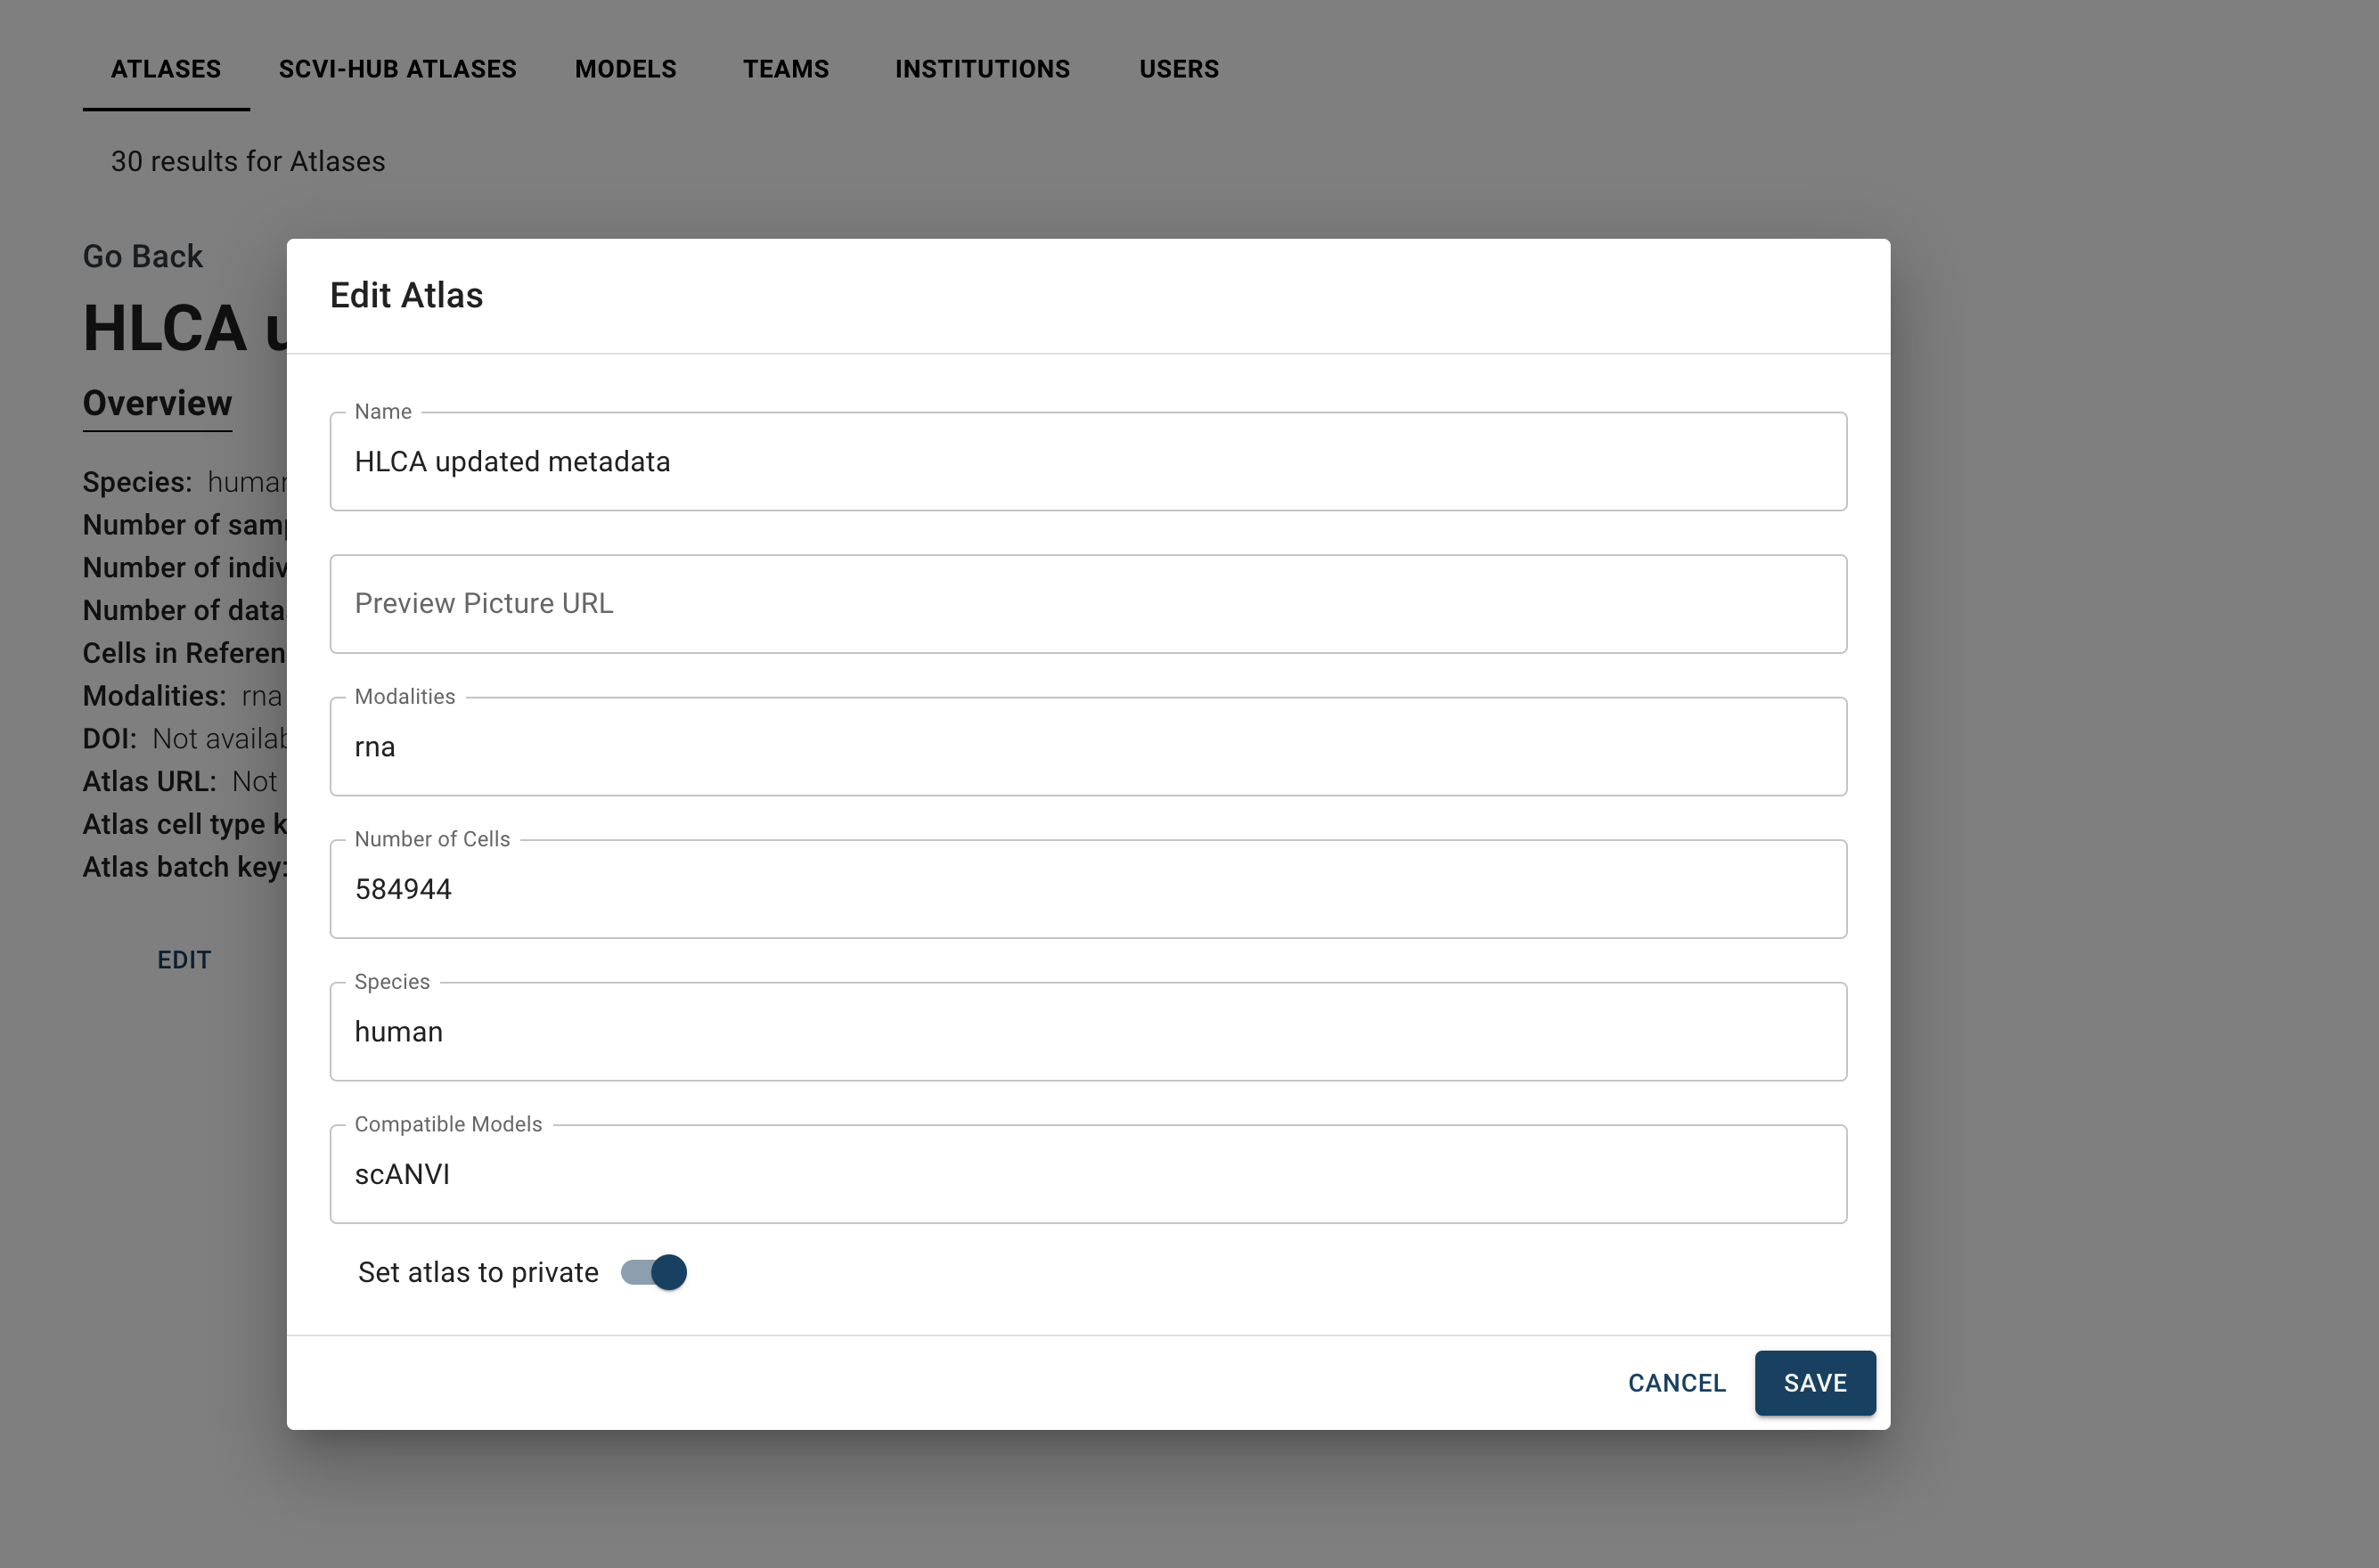
Atlas name to display: This is the display name of your atlas on the website.
Batch covariate key: The batch covariate key is the .obs column name of your AnnData object stored as your uploaded h5ad file. This column name is your chosen batch covariate label that was used during the integration of your atlas.
Cell type key: This is the cell type key that was used if you integrated with semi-supervised models scANVI or scPoli. If SCVI was used, please input one of the cell type labels in your .obs dataframe of your AnnData object.
Cell type keys for label transfer: Please input the cell type keys you would like to use for label transfer to the mapped query data. Each of the keys should match one of the cell type labels in your .obs dataframe of your AnnData object and should be separated by commas (if there are two or more levels of cell type labels you want to map to).
Number of cells: The number of cells in your atlas.
Species: The species that your atlas models.
Set atlas to private: If True (default), your atlas will not be public for other users to map to after the revision stage. If False, all users of ArchMap will be able to access and map to your atlas post-revision.
Once the atlas and model files are uploaded, you can see your atlas in the list of uploaded atlases.

Atlas Revision Stage#
Upon successful upload of your atlas, its status will be set to “In Revision.” To complete the revision stage of your atlas, you need to benchmark your atlas through the ArchMap website (see below). This benchmarking pipeline also includes necessary steps (such as cell type classifier training) to prepare your atlas to be used for reference mapping and label transfer. Due to resource constraints, atlas benchmarking in ArchMap can only be done for atlases of size 4 Gb and smaller after running the aforementined preparation script. If your atlas is too large to run on the ArchMap website, you can also run the ArchMap benchmarking pipeline locally (see below for more details).
How do I benchmark my atlas?#
On ArchMap#
Navigate to the Search page using the sidebar. Under the “ATLASES” tab, search for the name of your atlas in the search bar. Hovering over your atlas card, select “ATLAS BENCHMARK.”

Upon selection, an info box will open. Clicking on “START BENCHMARK” will begin the benchmarking process. If successful, you will receive the alert “Benchmarking job triggered successfully!” If you receive the alert “Failed to trigger the benchmarking job. Please try again.”, please wait a few seconds and try starting the benchmark again. If the benchmark continues to fail, contact the ArchMap team via the contact form.

The duration of the benchmarking procedure will depend on the size of your atlas but should not take more than 12 hours. After benchmarking has completed, navigate back to the page where you started the benchmark. There, you will see a button “DOWNLOAD BENCHMARK RESULTS”, which will download a report of the benchmarking as well as the performance of the classifiers trained for label transfer of cell type labels that can be used during query mapping.

Locally#
To run the atlas benchmarking process locally, please follow these steps:
Clone the repository:
git clone -b benchmark3 --single-branch https://github.com/theislab/archmap_data.git
cd mapping
Create the environment:
bash create_env.sh
conda activate archmap_env
Set your variables:
The following variables need to be set according to your atlas. The HNOCA atlas info is given by default in the script.
modelName: The name of the model used for integration e.g. scPoli
atlasName: The atlas name e.g. HNOCA
classifierLabels: The the cell type keys you would like to use for label transfer to the mapped query data. Each of the keys should match one of the cell type labels in your .obs dataframe of your AnnData object.
modelpath_local: The directory where your atlas and model files are stored.
adatafile_local: The path to your atlas file.
batchkey: The batch covariate key is the .obs column name of your AnnData object stored as your h5ad file. This column name is your chosen batch covariate label that was used during the integration of your atlas.
celltypekey: This is the cell type key that was used if you integrated with semi-supervised models scANVI or scPoli. If SCVI was used, please input one of the cell type labels in your .obs dataframe of your AnnData object.
Run the script:
python scarches_api/run_local_benchmark.py
If you come across an issue, please don’t hesitate to contact us through the contact form on the website.
The Benchmarking Procedure Explained#
Why we benchmark
Benchmarking all atlases uploaded to ArchMap ensures control over the quality of atlases available for mapping. The benchmarking process allows the ArchMap team to verify that an atlas integration performs comparably to other integration methods. We note that we do not re-integrate the atlas using the method originally used by the uploader but instead train separate models and compare embeddings using existing integration benchmarking metrics (scib-metrics). For more details on how benchmarking is conducted, see:
Pipeline Overview
The benchmarking pipeline performs the following steps:
Benchmarking the atlas integration:
Two additional integration methods are trained depending on the original model used.
To accommodate large atlas uploads, we subset the atlas to 200,000 cells while maintaining all cell types and proportions.
Due to subsampling, batch effects may be unintentionally removed, resulting in higher batch correction scores for newly trained models compared to the user-integrated model. This is considered during atlas revision.
Minification of the atlas:
The reference embedding is stored, and count data is removed from the AnnData object to improve reference mapping speed.
Training classifiers for label transfer:
XGBoost and KNN classifiers are trained and stored in Google Cloud Storage along with the atlas.
Benchmarking Output#
The benchmarking output includes:
scib-metrics report comparing newly trained integration models with the user-integrated model. A min-max scaled version of benchmarking metrics is also included.
Validation results of the XGBoost and KNN classifiers on 20% held-out reference data, using the cell type label inputted by the atlas builder during upload.
Atlas privacy status#
An atlas uploader can at any time choose the privacy status of their uploaded atlas. When an atlas is set to private it is not publicly available for mapping and can only be accessed by the atlas uploader. A public atlas can be used by all users of ArchMap for mapping. To change the privacy status of your uploaded atlas, go to the Search button on the sidebar. Navigate to your atlas card and click on Learn More and then edit. At the bottom of the edit atlas box that is opened (pictured below), you can toggle your atlas between private and public. When the toggle is set to on, this means that the atlas is set to private.